October is a busy month for me as we have 7 family members celebrating their birthdays. Yes, all the same horoscope, Libra. Here's one cake I had made and is for my hubby, an eggless tiramisu cake using recipe from Laura Vitale. This cake is non-bake and easy, just needing more time for the cake to set in the fridge. You will need at least 5 hours so I would prefer to prepare this cake a day earlier.
You could watch her YouTube video at https://youtu.be/w5fXGQIgHmo
Note: The recipe calls for 2.5cups of very strong coffee, I was using the baking measuring cup and I found that I didn't need that much. Maybe half of it would be more than sufficient.
Here's another tiramisu cake I made using the same recipe but with more designs on it:
It's Summer! Hot! Super hot! And it's also the time where mangoes are plentiful. Did you realize in recent years there are many jumbo mangoes around? This size is perfect when you want to decorate your cakes by slicing out more flesh out of it.
Here's a non-bake cheesecake using mango, modified from Christine's Recipe.
Ingredients
120g Oreo cookies
70g butter, melted
250g cream cheese, room temperature
55g caster sugar
150ml thickened cream/ whipping cream
2 tsp gelatine powder
30ml hot water
1 big ripe mango, peeled
Lemon juice or essential oil (I only use Young Living essential oil that is safe for ingestion)
Apricot jam (Orange marmalade works too) & hot water to glaze
Method
Remove the cream sandwiched between the oreo cookies and process the cookies in a food processor/blender until
finely crushed. Add melted butter to combine and transfer the crushed cookies mix to the base of a spring form pan. Use a spatula to press them firm and chill in freezer for 15 mins or until firm.
Stir the gelatine powder in hot water until the gelatine dissolves. (Remark: If you find it's difficult
to dissolve the gelatine completely, place the bowl of gelatine mixture
in a large bowl of hot water. It helps the gelatine to dissolve easily
and quickly.)
Use an electric mixer to beat the cream cheese
and sugar until smooth and creamy. Add lemon juice/ essential oil. Mix in the cream using slow speed until combined. Pour the gelatine mixture in and mix well. Pour the cream cheese mixture over
the biscuit base. Tap the pan firmly on the table to level it or release some trapped bubbles. Refrigerate until firm or overnight.
Remove the cheesecake from the fridge 15
minutes before serving.
Cut the mango into cubes, set aside. For the balance of the mango flesh, pour into blender with some lemon juice/ essential oil and blend them well.
Spread the mango puree onto the cheesecake and arrange the mango cubes on top.
To glaze, microwave (20secs) 1 tsp of apricot jam and hot water, wait till it is slightly cooled and brush onto the fruits using a pantry brush.
Lemon (Citrus limon) has a strong, clean, purifying citrus scent that is
revitalizing and uplifting. It consists of 68 percent d-limonene, a
powerful antioxidant. It is delightfully refreshing in water and may be
beneficial for the skin. Lemon essential oil is cold-pressed from the
rinds of lemons. Jean Valnet MD estimated that it takes 3,000 lemons to
produce one kilo of oil. In his book, The Practice of Aromatherapy,
Valnet wrote that lemon is a tonic for supporting the nervous and
sympathetic nervous system. Lemon has an approximate ORAC of 6,619
(TE/L). TE/L is expressed as micromole Trolox equivalent per liter.
With a birthday tag, it's ready to be delivered as a birthday cake :)
Two of my friends have adopted mini Schnauzers dogs months ago and last Saturday was my first time meeting them (the dogs) at a dog cafe. One of my friends' birthday is approaching so I have decided to bake a cake for him. Since we are all dog-lovers so naturally I wanted to design the cake with some dog elements. Quite challenging for me since it was my first trial piping a dog design. I baked a coffee sponge cake and whipped up kahlua cream as the filling and topping. Here's the Schnauzer cake for my friend.
Recipe of coffee sponge with kahlua cream could be found in my earlier recipe (http://yukiecody.blogspot.sg/2013/08/coffee-sponge-with-kahlua-cream.html), I used a different flour brand and added much more kahlua this round and next time I want to add rum perhaps LOL. To pipe the dog design you will need to separate your cream into 2 portions. With a much large portion uncolored for frosting and some to pipe the muzzle part. Color a small portion of cream with black food coloring to achieve grey. Transfer cream into piping bag/ ziplock bag and without the need of any piping tip just snip off the tip of the bag and you may start your pipe. I used 3 slices of strawberries for ears and tongue, 3 chocolate chips for eyes and nose and half a marshmallow as muzzle (fully covered by the white cream in the picture). As for that bone shape biscuit, it was actually a dog treat.
Cake frosted without the dog design yet, I kind of like it simple just like this. Without frosting the sides, just the filling and spreading a layer of cream on top. This frosting design is using a spatula to do dab-n-pull in circular motion from working towards the center.
I have been hesitating for very long before I attempted to bake this super sinfully-good dessert. Not so much as I am afraid of the extra calories but the heatiness of chocolate is deterring me. Yesterday I gave in, just want to see how difficult it is to achieve the flowing lava inside the cake and to my surprise it is very easy to make. The main idea of this chocolate cake is to make sure that it is underbake so that the center part is uncooked and flow out like hot lava. So if you fail the first time, don't let that stop you. Simply adjust the timing and you will get it.
I reduced the recipe to halve so that I could try it using my air fryer which is older model and having a small capacity. Air fryer recipe is originated from http://www.ourprincessdana.com/2013/12/cooking-with-air-healthier-choice.html. Oven recipe can check from www.noobcook.com
Ingredients (yields 2 ramekin size)
50g dark chocolate (use chocolate bar and break into pieces or compound chocolate chips from baking store like Phoon Huat)
50g unsalted butter (cut into small pieces)
1 egg
25g castor sugar
10g self-raising flour
Methods
1) Melt chocolate and butter using microwave.
2) Beat sugar and egg until frosty and pale with electric whisk.
3) Pour melted chocolate and butter into batter, add flour and mix well with a spatula.
4) Grease 2 ramekins with melted butter and pour the batter. It shouldn't exceed 3/4 full to allow space for expansion. For my standard size ramekins it didn't quite fill up to 3/4.
5) Bake at 180 degree C for 7-8mins using a pre-heated air fryer.
6) Remove from air fryer and leave it to cool for 1-2mins before removing using a knife to loosen the edge.
7) Serve hot with icing sugar or ice-cream.
Such a pity that I couldn't capture the photos nicely due to the fast melting ice-cream, couldn't even see the flowing lava. Next time it shall be ;)
"Oh no my block of cream cheese is expiring soon!" I exclaimed when I was checking my stuffs from the fridge. Time to make something out of it, here's a easy one from Angela Chia.
Ingredient
250g cream cheese block
65g castor sugar
1 beaten egg
6 oreo cookies
Fresh vanilla beans or essence
Red food coloring gel
Toothpick
(Recipe modified from Angela Chia's.)
Method
1) Remove the cream sandwiched between the oreo cookies and place the cookies into bakable cup.
2) Cut cream cheese block into cubes and whisk together with the sugar well. Add in egg and vanilla beans till combined.
3) Scoop the mixture into 6 cups and leave a bit of the mixture for coloring. Firmly tap/knock the cups on tabletop to burst the trapped bubbles.
4) Using a piping bag, snip off the tip and pipe 7 dots on the top.
5) Use a toothpick to circle/ connect all the 7 dots forming a trail of connecting hearts.
6) Bake at pre-heated oven at 150 degree Celsius for about 20mins.
7) Cool at room temperature and fridge for at least 4 hours before serving.
The fresh vanilla beans really enhanced the flavor
Ingredient
1 pack of pre-sweetened konnyaku powder (small packet from supermarket, Phoon Huat sells bigger pack)
1 tbsp dried osmanthus
1 tbsp wolfberries (pre-soaked 15mins before use)
Method
1. Bring the required amount of water to boil, lower heat and add osmanthus for a min.
2. Add konnyaku powder and stir until dissolve.
3. With 2 jelly mold trays, place 2-3 wolfberries into each mold and fill it up with the konnyaku solution.
4. Leave it to cool down a little before transferring to the fridge. Serve chilled.
Baking a cake for a professional baker is not easy, she is already so good and whatever I am going to bake will not be as good as her of course. The only option I have is to personalise the cake so that she can feel my sincerity and I believe she will, for every idea I had, she was in my thoughts. I started to conceptualize the design 2 weeks piror to her birthday. Did some research on internet on the types of golf bags and clubs, saving some of the photos into my phone as reference and started shopping for the ingredients. I have decided to make a tiramisu cake and complement with fondant deco. Yes I know fondant and wet cakes are No-No combination but it should be fine as long as we eat the cake quickly...hahaha. Oh yes I am quite stubborn when it comes to this area, I will insist on my way. Last Christmas I did a fresh cream cake with angry birds using fondant, had a few sleepless nights trying to think of how to maintain the dryness of the deco while keeping the cake cold. In the end I added the deco only before serving and viola! That solves the issue. But I wouldn't encourage you to do the same way as I did. It is definately safest to make a true fondant cake without the wet toppings (fresh cream/ tiramisu).
Halloween is approaching and let's party with some fun snacks. My husband commented that I was playing with my food but trust me, it's fun ;) You should try these with your kids, have fun making the snacks for the party guests.
I have done 3 types of creepy but cute snacks this time and here's the sharing.
6-Legged Spiders In the House...YUCKS!!!!!!
Freak me out with Frankenstein Pops
You Are Cordially Invited to the Mummies' Wedding
Date: 31 Oct 2012
Time: 12.00am
Venue: Cookie Cemetery
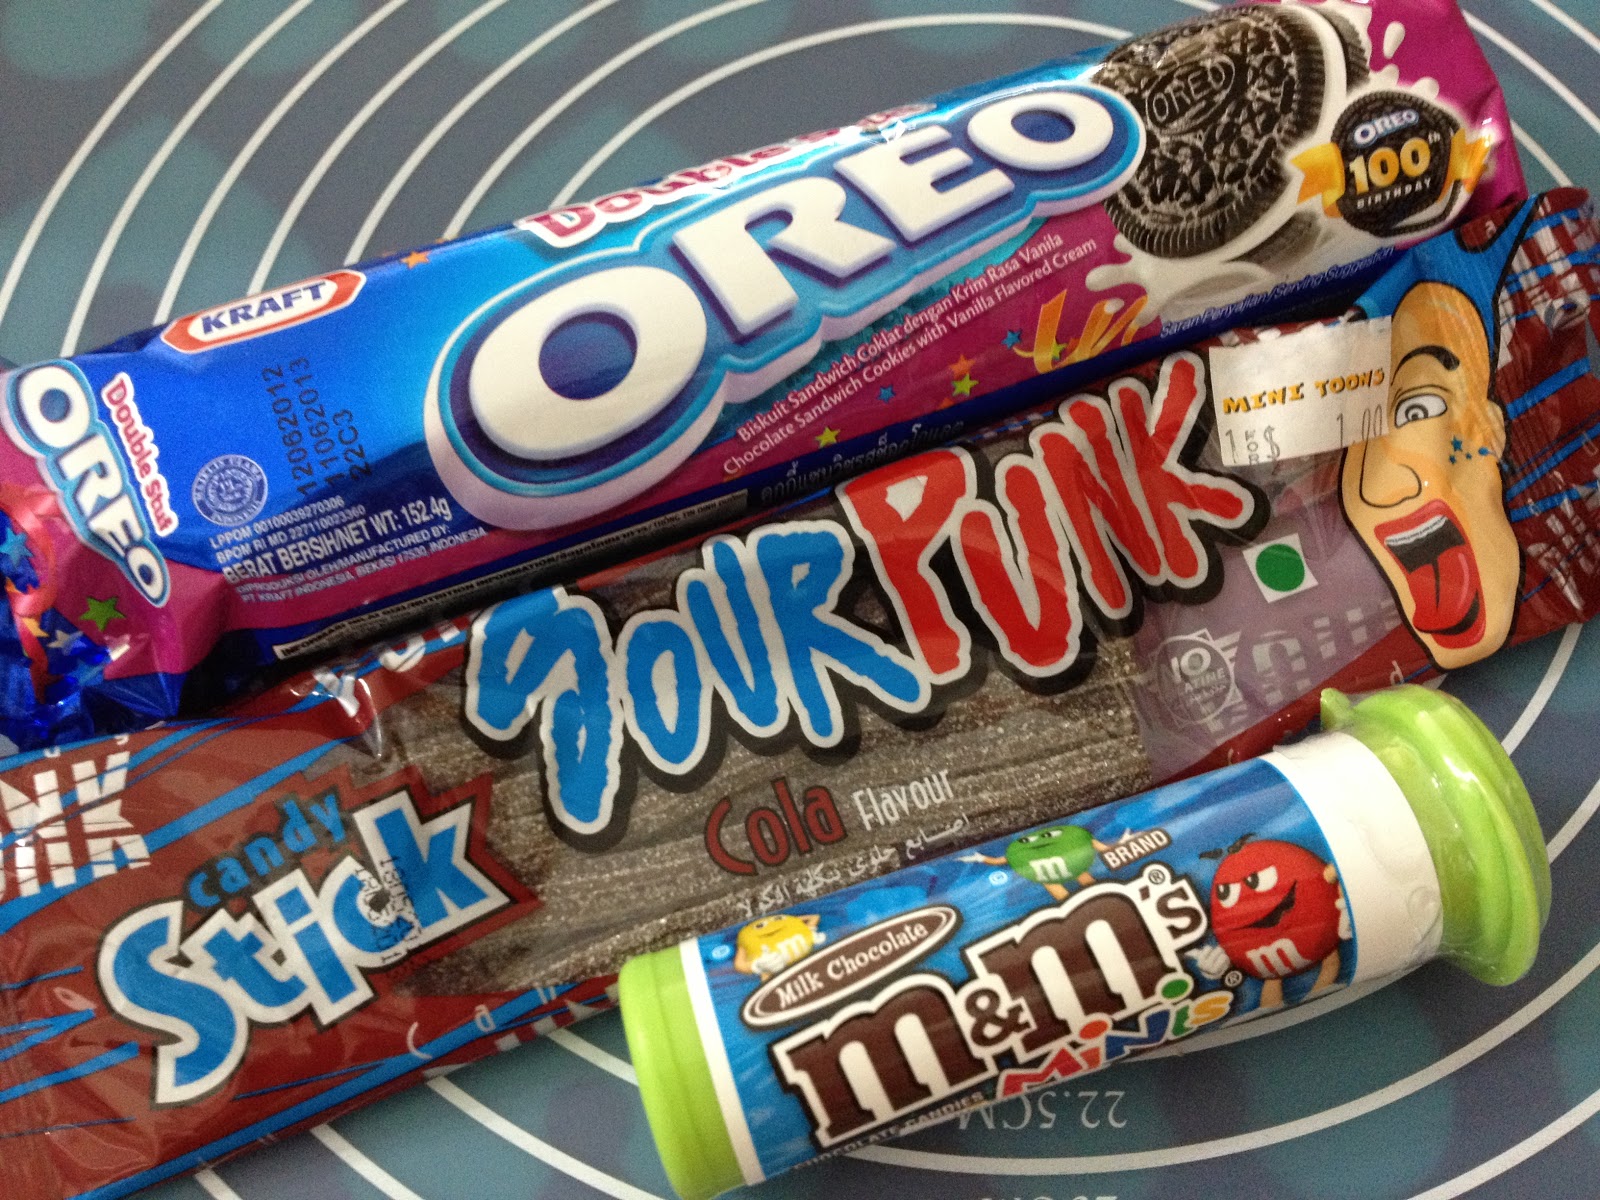
How to do Halloween Spiders? You will need...
Oreo cookies (double stub) - $1.80
Sour cola candy stick - $1.00
M&M's minis - $1.50
Fondant or gum paste or icing (as glue)
1) Cut the sour cola candy stick into 3 pieces of equal length. You will
need 2 sticks to make 6 legs. Yes spider has 8 legs but these are mutant
spiders, so 6 legs each..hahaha...
2) Open the orea cookie, push the 6 legs (candy sticks) in and cover the
cookie back. Make sure that it is sandwiched properly without falling
apart.
3) Use fondant or gum paste or icing as food glue to stick 2 M&M's minis as the eyes.
4) VIOLA! Your super easy 6-legged spiders are ready to crawl all over the place!
Check out the Spidy video on how to make these yucky 6-legged spiders.
How to make Halloween Frankenstein Pops?
Marshmallow
White chocolate compound
Green tea powder
Chocolate rice
Lollipop sticks
White fondant
Edible black marker
1) Use a toothpick to poke a hole in the marshmallow and insert a lollipop stick to it.
2) In a microwavable bowl, add white chocolate compound and microwave at high heat for 30 seconds. Check whether the chocolates have melted using a spoon. If no, microwave for another 20 seconds.
3) In the melted chocolates, add in green tea powder and mix well. You could adjust the shade of green by adding more powder.
4) Dip the marshmallow (with lollipop stick attached) into the bowl of chocolate and coat evenly.
5) Without delay, dip the top (Frankenstein's head) into the bowl of chocolate rice. That will be his hair.
6) Paste 2 round white fondant onto the face of Frankenstein as eyes. Bigger will be cuter.
7) Place them onto baking paper for chocolate to set.
8) Use the edible black marker to paint the pupils on the fondant.
Here's a mini video made for fun ;) FREAKY!
How to make Halloween Mummies?
Oreo cookies (double stub)
M&M's minis
Fondant
Lollipop sticks
Edible black marker
Pink food coloring gel (optional)
1) Roll the fondant into thin sheet, use a dough cutter to cut into thin strips.
2) On the oreo cookie, insert the lollipop stick. Start to paste the strip on the cookie one by one starting from the edge.
3) After 1-2 strips, paste 2 M&M's mini chocolates as eyes onto the cookie. Use fondant to aid as glue.
4) Continue to paste the thin strips onto the cookie until you finish
covering the whole cookie. You will realize that the black cookie
staining the white fondant strips but it is ok, remember they are
mummies. Not meant to be clean after many years underground ;)
5) Use the black marker to draw the pupil.
6) If you wish to make the pink mummy, use pink food coloring gel to color
the fondant and black marker to draw the sexy eyelashes ;) Oh my sexy babe!
Have you ever wonder how is it like when mummies fall in love? Never heard before? Well, here they are. Enjoy this short armature clip which I called it their wedding montage:
Weather is so hot lately and here's an ice-cream cake I made for my friend's birthday, just perfect for the killing weather. Is pretty easy, I modified the recipe for mango float to acheive this.
Ingredients
1 can nestle cream
1/2 cup condensed milk
225ml whip cream
1 can peach slices
1 pack of cream crackers
Ladyfingers
1/2-1 tbsp unsweetened coco powder
Grated cheese (optional, I used mixed mozarella & chedder cheese)
Spring form baking pan
Some ingredients that I used
Method
1) Whisk the whip cream till thick and smooth. From 225ml mark, I whisked till it reached almost to 600ml mark.
2) Mix nestle cream and condensed milk well. In fact I used slightly less than 1/2 cup condensed milk as the fruit that I am using is already sweet. You could adjust according to your desire for sweetness. If the mixture at this point is not smooth, use a seive before pouring into the whip cream. Use a spatula and to mix well.
3) Divide the mixture into 3 portions. 2 portions plain mixture and 1 portion add in the coco powder and mix well. You can add more if want a darker chocolate color.
4) Shorten the ladyfingers by halve and line a 8 inch springform tin.
5) Cover the base with cream crackers. Lesson learnt is to break the crackers with a knife to fill up the odd edges. I tried using my hands to break the crackers and I ended up with undesired sizes. However if you are using a square tin, such problem will be minimised.
6) Cut the peaches into small pieces and line a layer on top of the cream crackers.
7) Spread a layer of plain mixture on it.
8) Repeat step 5-6.
9) Spread the coco layer on top.
10) Repeat step 5.
11) Spread the plain mixture on top.
12) Sprinkle some grated cheese if you like.
13) Design your cake top with the balance peaches you have.
14) Cover the springform with foil and now is ready to freeze overnight transforming into ice-cream.
15) Before serve, leave it in room temperature for around 30mins otherwise it will be too icy hard to cut. Remove the ring from the spring form pan and if you like can tie a ribbon around the ladyfingers.
This time is for baby girl so the theme is Pink & White, simply love these adorable cutters! Delicated to the number 6th kiddo in the family, Baby Angel!
To complete the look, I have managed to get some material for the gift packaging.
Very satisfied with the overall look of it.
To get started these are what we need, the so-called ingredient list in pictoral form:
1) Prepare a working area/mat/board to roll the fondant, dust the area and rolling pin with icing sugar.
2) Take out a piece of fondant, color it with coloring gel and dust with icing sugar to reduce wetness/stickiness.
3) Add coloring only a little at a time, use a toothpick to pick up color from the container. Knead the fondant until the color is well spread.
4) Roll the colored fondant flat & thin before placing cookie cutter (meant for fondant use) to cut out the shapes.
5) Place your ready shapes on a tray/container lined with baking paper dusted with icing sugar.
6) Air dry them so that they are not too soft, I normally use them the next day.
7) Prepare the "glue" using icing sugar and water until u achieve a gluey texture but easy to spread.
8) Glue the fondant shapes onto the cookies and you are ready to pack them.
B) 500ml water 120g sugar 1 tbsp osmanthus 2 water chestnuts (finely chopped)
Methods 1. Mix ingredients A together until no lumps, set aside. Sieve will be helping to obtain a smooth paste. 2. From ingredient B, bring 500ml water to boil and dissolve sugar. Off flame and add in the osmanthus to infuse for 2 mins. Add in the water chestnuts. 3. Slowly pour A into B and stir as you pour until you achieve a smooth paste. 4. Pour the paste into a lightly greased 7 inch tray. 5. Steam 10 mins over high flame and another 10 mins over medium flame. 6. Cool down totally before slicing. 7. Serve chilled.
Ingredients
1/2 rockmelon
1/3 cup sago
1/2 cup water
1/2 cup sugar
60ml coconut cream (I used Kara brand)
1/2 tsp salt
Some atap seeds
Methods
1) Boil 1/2 cup sugar and 1/2 cup water till sugar dissolves, set aside.
2) Boil sago in water using medium to high heat for 6-8mins until most sago turn translucent. Off fire and keep pot covered for 5 mins. Do not over cook the sago or the whole pot will become gluey mess.
3) Sieve the sago and rinse with cold/tap water.
4) Using a melon scooper to scoop out the rock melon in round balls or simply using a small spoon to scoop into semicircle shape. Using knife to cut into cubes also can.
5) After you have scoop out most of the flesh, use a spoon to dig out the balance of the flesh and use a masher to make puree. Do not dig too deep, we do not want the green skin portion.
6) Now your boat is almost ready, shave off a bit of the outer skin with knife for it to stand properly.
7) Pour puree, melon balls, sago, coconut cream, syrup and salt into a bowl and mix well. I used about half of the syrup I mixed, you can use more to your desired sweetness.
8) Chill for at least 1 hour.
9) Serve the dessert in the boat prepared earlier and top with atap seeds. You could also add ice cubes/ shaved ice.
Notes
You could add more coconut cream to this recipe so that more pax can share but the boat (1/2 rockmelon) can only take in about 60ml.
I went through a lot for this project and so far the most painstaking one. I planned this probably a month ahead and started with purchasing cookie cutters from ebay. Well, one month the cutters should arrive by then but it didn't. It was lost :(
Sometimes things don't always turn out to be how you planned. A week before the baby shower, I sourced for another seller and and managed to get the cutters I want. heng ah!
With a butter cookie recipe, suitable cookie cutters, ready-made fondant, coloring gel, gift accessories I embarked on the project one day before the event. During the process of making the cookie dough, I realised my wooden rolling pin have molds. Arrggghhh just not my day, discarded the rolling pin and here's come my powerful and muscular arms. I manually rolled the dough and this dough was tough. Gosh it took me forever to roll the dough and cut their into desired shapes. My arms especially right hand started to shout for help but I couldn't stop. Finally I finished trays of cookies and they turned out very cute, don't you agree?
What did I say about things don't always turn out as what you planned? I put in the wrong amount of butter and the cookies were hard as rocks! No joke, I dropped one on the floor and it didn't break. Wow, it was shock-proof! How I wish these are my handphones, super robustic. Sigh, project failed. I was very upset looking at 70 cute and strong cookies, and at the same time my right arm was hurting me. I pasted ache-relief plasters on my arm and rested.
Did I mention that when you are down on your luck, everything just doesn't go your way? What could be worst than a painful arm right? Let me tell you, both arms! Soon the left arm also start to hurt and so painful that I couldn't move for the entire evening. I had no choice but to pop painkiller and go for an early night rest.
The next day.... I woke up feeling much better, although arms were still aching but at least I could move. The day before was really a nightmare, thought I might need to visit a doctor if the pain persisted. I walked into the kitchen and saw that 70 cookies again. Sigh, still hard as rocks! Stubborn rocks! Suddenly, a bulb appeared! A bright idea came from joking hubby "Just buy ready-made cookies loh...hehehe". YES! I have a box of cookies and I still have some time. Without delay I rolled out the fondant, colored them and cut into the patterns that I wanted. Needed some time to air dry them before sticking them to the cookies and wrap it up as gift. Weren't my arms still hurt, yes they were but I was glad that my project didn't fail entirely. At least I still manage to come up with a substitution and I love how the gift turned out to be.
This idea striked me on Saturday morning, a new flavour for muah chee using ingredients that I already have in my kitchen. My mind got busy after that to think through the process of making it works after I have decided on the flavour.
Here it is, my new flavour:
Ingredients
1 cup glutinous rice flour
3/4 cup water
1/2 tsp baking green tea powder
About 3-4 tbsp red bean paste
1 tsp shallot oil
Peanut powder (with sugar) for coating
Appliance used
Happycall pan (hcp)
Methods
Mix the first 3 ingredients in a cup or bowl until no lump.
Roll the red bean paste into a long dough using cling wrap as long as the length of hcp, set aside. You could adjust the paste quantity according to your preference, but I would recommend a thin dough.
Heat up hcp with shallot oil, slowly pour the batter and make sure it covers the entire pan.
Once the batter sets from the sides, place the red bean paste on top of the batter and use tongs to start wrapping the paste.
Once the batter is cooked, remove from hcp and coat with peanut powder.
Cut the coated muah chee into small pieces and serve.
Pictures speak a thousand words, here are the photos taken during the cooking process:
Where to purchase the ingredients?
Red bean paste - I got mine from Phoon Huat at $7.50 for one kg. Too big a pack? Alternatively you could try Daiso for it's 200g pack.
Baking green tea powder - From Phoon Huat too, comes in a bottle.
Peanut powder - This is from supermarket, there are few brands to select from. Mine is Camel brand and it comes with sugar.