Thursday, 4 October 2012

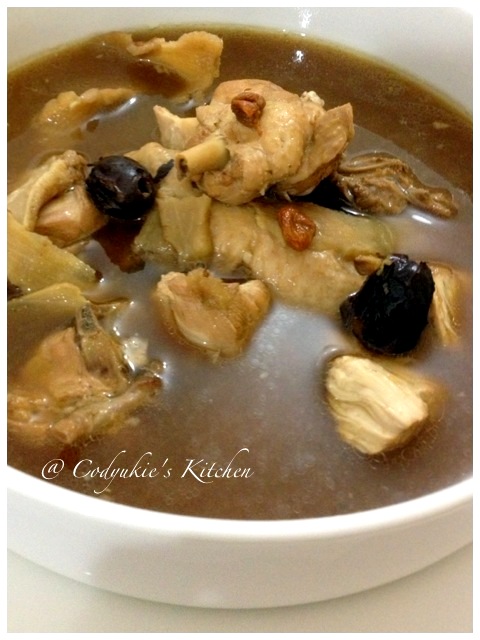
A bowl of goodness - Chicken Soup

It is almost impossible to cook Cantonese soup after work as it requires 3 hours to brew. But if you have a thermal pot, it will ease you from that issue. Thermal pot's technique involved bringing food up to temperature on the fire as usual, but rather than allowing it to cook over the flame for long hours, the hot pot was placed in an insulating material and covered. The heat in the pot was conserved for a considerable length of time, and the food inside would cook slowly, without the need for supervision. Gas or electricity were saved in this way, it is good for food that needed long slow cooking like soup and stew. 

What I did was preparing my soup the night before, boil for half an hour and transfer to thermal pot. The next day after work, reheat the soup for another 20 mins and viola! You can enjoy flavorful Cantonese soup even on weekdays.


If you are like me who doesn't know what type of herbs to add in for chicken soup, you could purchase premix packs from supermarkets or provision shops. Each pack will cost around $3-4. But I have a better suggestion here, go to Chinese Medical Hall and ask them to pack a $4-5 herbs. Just tell them you will be using it to make chicken soup and they will pack the fresh herbs into a bag like the photo shown here. In this way you will get fresher herbs for your soup.


Tuesday, 2 October 2012

Sukiyaki

I have tried Sukiyaki from few Japanese restaurants and they are always very salty. I wonder why they like to make it so salty? After a few tries I stopped ordering this dish at the restaurants. Not too long ago, I chanced upon this online recipe and thought I could give it a try since I am able to adjust the level of saltiness to my liking. Surprise me! It is very delicious and not salty, definitely a keeper! This is why I like home-cooked food, my kind of less-salty Sukiyaki ;)


Ingredients
1/3 packet of sukiyaki or shabu shabu frozen pork
1/4 tbsp oyster sauce
Pepper
1/2 yellow onion or 1 red onion (sliced)
3 garlic cloves (minced)
1/2 carrot (thick slices)
1 potato (wedges)
1 pack enoki mushroom (aka golden mushroom)
Spring onion
Cornflour

Sauce
2 cups water
1 pk of dashi powder
1/4 tbsp oyster sauce
1/4 tbsp light soya sauce
1 tsp mirin
Dash of sesame oil
Dash of chinese cooking wine
Dash of pepper

Methods
1. Season the pork with oyster sauce and dash of pepper.
2. Prepare the vegetables.
3. Heat pan or pot with little oil and saute onion and garlic til fragrant.
4. Add in the pork, carrot and potato and fry till pork is slightly browned.
5. Prepare the sauce by adding all the seasoning into the cup and pour into the pan.
6. Bring the sauce to boil, cover with lid and lower the fire.
7. When the carrot and potato turn soft, add in the mushrooms.
8. Taste the sauce and add more seasoning according to your preference.
9. Thicken the sauce with cornflour and garnish with spring onions.

Notes
1. Frozen pork sukiyaki or shabu shabu are available in the supermarket, I will usually choose the pork belly part of the meat. A packet costs between $7.50-$7.90. It is actually inexpensive since I only use 1/3 packet for 2 person's share.
2. Recipe is modified from  http://munchministry.com/recipe/japanese-soy-sukiyaki-pork-stew/

Monday, 1 October 2012

Hearty Cranberry Cream Cheese Bun


Ingredients for Dough
WET
1/2 beaten egg
35g condensed milk
83g tangzhong
60ml water

DRY
200g bread flour
50g cake flour
50g castor sugar
7g yeast

1/2 tsp salt
10g shortening
10g unsalted butter

Ingredients for Tangzhong
30g bread flour
150g water

Ingredients for Filling
188g cream cheese
60g icing sugar
1.5 tbsp lemon juice
Cranberries

Methods
1. Cream icing sugar and cream cheese, add in lemon juice and beat well. Leave inside fridge to harden so that it will be easier to wrap into dough at later stage.


2. To yield about 83g of tangzhong, you will need to mix 30g bread flour with 150g water (1:5 ratio). Use low fire to heat the mixture and constantly stir with a whisk until lines appear. Off fire immediately and transfer tangzhong into a bowl. Cover tangzhong with cling wrap to prevent the surface from drying. Leave it till room temperature before using.

3. To prepare the dough in a bread machine, add all the wet ingredients first. Followed by the dry ingredients like bread flour and cake flour to cover the liquid. Add sugar along the side. Use middle finger (haha, ok index finger also can) to make a well at the center of the flour and pour in the yeast. Careful don't allow the yeast to touch the liquid. Press the "Dough" feature on the bread machine to start the mixing. This feature requires 1.5 hour incorporating proofing (I am using Kenwood bread machine).


4. The machine will mix the mixture and stop after 1 or 2 mins, at this moment add in the shortening, butter and salt. The machine will start again to knead the dough.

AFTER 1.5 HOURS...

5. Bread machine will beep indicating dough is ready. On a floured counter top, punch your dough to release the trapped air. Floured your hands and knead the dough a bit, the dough is sticky but do not over knead. Weigh the dough and divide into doughs of 60g. Add cranberries and make round doughs. I added about 5-6 cranberries per dough. This recipe yields about 9 doughs.

6. Leave expandable gap between each dough and allow them to rest for 15mins covered with cling wrap.

AFTER 15 MINS...

7. Flatten each dough with rolling pin, use 2 spoons to assist in adding the cream cheese onto the center of each dough. Wrap the dough and seal it up using finger tips to pinch and close the gaps. Round into balls and transfer to a baking tray line with baking paper. Use your palm to lightly flatten the balls. Set aside the remaining cream cheese for piping (optional).

8. Cut out a heart shape on each cranberry with scissors and place it at the center of the ball.

9. Proof doughs for an hour.

10. Pre-heat oven 20mins before baking, use 160 degree with bottom heat plus fan feature.

AFTER 1 HOUR OF PROOFING...

11. Using a piping bag or simply a clean plastic bag, scoop the remaining cream cheese in and cut a tiny hole at the tip. Pipe swirl design on the dough or any other design as preferred. This is optional.

12. Bake for 10mins, take it out and flip over. Use a spatula to press lightly and bake the other side for another 7 mins.
Notes
1. Egg wash is not required for this recipe.
2. If you don't have a bread machine, use a mixer and knead & proof like how you did for normal bread making.
3. This dough is sticky type but yield a soft texture.
4. Thanks Molly for the modified version of MM recipe (http://munchministry.com/recipe/raisin-cream-chesse-bread/)

 Enjoy your buns with a cup of tea on a lazy afternoon, that's my ideal afternoon tea break ;)
Korean BBQ Pork with Ssamjang


Another popular Korean dish that I would called it my favorite is this BBQ pork wrapped with crispy lettuce and ssamjang. Ssamjang means wrapping sauce and is usually eaten with BBQ meat. Typically the Korean will put meat, vegetable, rice, ssamjang onto a leaf of lettuce and roll it into bite-size.


Ingredients

200g pork belly or pork collar
1 tbsp light soya sauce
1 tsp sesame oil
1 tsp Chinese cooking wine
Dash of pepper
1 garlic clove - minced
Crispy lettuces
Cooked rice
1/2 Japanese cucumber

Ssamjang Ingredients
1.5 tbsp soybean paste
*1 tbsp gochujang (hot chilli paste)
1 tbsp sugar
1/2 tbsp mirin
1 tsp sesame oil
1 garlic clove - minced
Sesame seeds

Methods
1. Slice the pork belly or collar thinly, marinate with soya sauce, sesame oil, wine and pepper for 15 mins or longer.
2. Heat the pan with cooking oil and saute the garlic till fragrant, add in the pork slices and grill till cooked and browned.
3. Make the ssamjang sauce and serve in a sauce bowl, adjust the sugar level to your preference. I am using Chinese version of soybean paste so the level of saltiness may vary from Korean soybean paste. Hence it is important to try your sauce while mixing.
4. Slice the cucumber thinly and set aside.
5. Wash the lettuces, serve together with cooked rice, ssamjang and bbq pork.
6. To enjoy this dish, hold a leaf of lettuce and scoop some rice onto it, add a slice of bbq pork, a little ssamjang and a slice of cucumber. Wrap the fillings with the lettuce into bite size and pop it into your mouth ;) Boss, one can of beer please! Hehehehe...

Notes
1. This dish is especially great if you can do it using a hot grill pan and grill your meat while dining. Otherwise using happycall pan like what I did is fine as well.
*2. You can refer to my previous post on Bibimbap for photo of gochujang


Bibimbap 비빔밥

Bibimbap 비빔밥 is a signature dish in Korea. Bibimbap means "mixed rice" served with toppings like vegetables, meat and gochujang (chili pepper paste). The rice and toppings are stirred together thoroughly before eating.


Ingredients
2 bowls of cooked rice
80g minced beef
2 eggs
3 shitake or Chinese dried mushrooms (latter needs to pre-soaked)
1/2 carrot - cut into thin strips
1/2 Japanese cucumber - cut into thin strips
2 handful of bean sprouts
Spinach
3 garlic cloves - minced
Gochujang paste
1/2 tsp sesame oil
1/2 tsp light soya sauce
pepper
salt


Methods
1. Bring a pot of water to boil, add 1/2 tbsp salt.  Add bean sprouts and boil for about 15 mins. Drain off extra water and season with 1/4 tsp sesame oil, 1/4 tsp light soya sauce, some minced garlic and pepper. Set aside.
2. Boil the mushrooms for about 2 mins, drain off excess water and does the same as bean sprouts.
3. Boil carrot and cucumber separately for a min each, drain and set aside. No need seasoning.
4. Boil spinach and 3mins or until it turns soft, set aside.
5. In a pan heat up the cooking oil and saute balanced minced garlic, add in 1/2 tbsp of gochujang paste till fragrant. Add in the minced beef and stir fry till cooked.
6. Cook 2 sunny side up.
7. In a bowl, fill in with rice first followed by the egg before you arrange the vegetables and beef. Lastly add in a scoop of gochugang paste. I used 1/2 tbsp of the paste but if you prefer to have it more spicy you could add more.
8. Stir before eating. Enjoy ;)

Notes
Gochujang paste could be purchased from supermarket, this is how the tubof Gochujang paste looks like.

Thursday, 13 September 2012

Balsamic Chicken with Butter Rice

I fell in love with balsamic vinegar when I was in Europe. I dipped my bread in it and used it as salad dressing for cherry tomato and mozzarella cheese. Over here mozzarella cheese is very expensive, it costs me about SGD7+ to get a small tub of 125g. The next time I go to Europe I will make sure I eat more of the cheese. One of the best deals I discovered is McDonald's salad cup. The salad comes in a cup and the toppings are 5 cherry tomatoes & 5 mozzarella cheese, it only cost me EUR1.99 if I remember correctly. Ask for balsamic vinegar dressing ;) Oh I had this at Austria, not too sure is it common in other parts of Europe. Ok back to recipes, recently I spotted this balsamic chicken recipe and it really taste good, have modified the recipe to share.


Balsamic Chicken
2 thighs or 3 drumsticks
1/2 cup balsamic vinegar
4 tsp brown sugar
1/2 tsp olive oil

Methods
1. Marinate the chicken with 3/4 of the seasoning (vinegar, sugar and oil) for few hours or overnight.
2. Heat pan (using happycall pan) with a little oil and cook the chicken together with the marinating sauce over low fire.
3. Once the chicken is cooked, serve.
4. Pour the remaining 1/4 seasoning into the pan, once boiled drizzle the sauce over the chicken.

Note
(Recipe calls for 4 tbsp of olive oil but I only used 1/2 tsp as I don't want my dish to be so oily. It turns out fine)

Butter Rice
1.5 cup rice grain
1.5 cup water
30g butter
4 garlic cloves (minced)
1/3-1/2 carrot (grated)
1 tbsp golden raisin
1 cinnamon stick
Pinch of turmeric powder (as coloring)

Methods
1. Rinse rice grain.
2. In a rice cooker, add in rice grain, water, carrot, raisins and turmeric powder.
3. Heat pan with butter, once melted add garlic and saute till fragrant. Add cinnamon and give it a few good stirs before transferring to the rice cooker. Stir well and on the power of the rice cooker.
4. Once cooked, fluff the rice and serve.

Note
I am using the rice cooker's measuring cup to measure my rice grain & water.

Monday, 10 September 2012

Herbal Prawn

Yes another prawn dish, please don't laugh! I know about cholestrol issue but I cannot help it. Come on, a few prawns won't kill....hahaha.... Ok this is an amazingly easy way to whip up a bowl of flavorful herbal prawns by just throwing everything into a pot. I think I am quite lucky to get this right combination by guts feel, don't we just love how our moms did their cooking by "Agaration"? ;)


Ingredients
10 medium size prawns
2 tbsp dried anchoives (de-boned type)
2-3 dang gui (angelica root)
1 dang shen (codonopsis root)
1/2 tbsp gou qi zi (wolfberry)
4 red dates (seedless)
2 cup water
Pinch of salt
1/2 tbsp chinese wine

Methods
1) Rinse the prawns and set aside.
2) In a pot, boil 2 cups of water to boil and add in all the chinese herbs and dried anchoives. Boil for 2 minutes, cover with lid and simmer at low fire for about 30mins.
3) The water level should be reduced to half by now, add salt and bring water to boil again. Add prawns.
4) Once the prawns are cooked, add wine and off fire. Do not overcook the prawns.

Notes
Here's a website showing the images of various chinese herbs for reference: