Wednesday, 30 July 2014

Oreo Mango Non-Bake Cheesecake

It's Summer! Hot! Super hot! And it's also the time where mangoes are plentiful. Did you realize in recent years there are many jumbo mangoes around? This size is perfect when you want to decorate your cakes by slicing out more flesh out of it.


Here's a non-bake cheesecake using mango, modified from Christine's Recipe.

Ingredients
120g Oreo cookies
70g butter, melted
250g cream cheese, room temperature
55g caster sugar
150ml thickened cream/ whipping cream
2 tsp gelatine powder
30ml hot water
1 big ripe mango, peeled
Lemon juice or essential oil (I only use Young Living essential oil that is safe for ingestion)
Apricot jam (Orange marmalade works too) & hot water to glaze

Method
  1. Remove the cream sandwiched between the oreo cookies and process the cookies in a food processor/blender until finely crushed. Add melted butter to combine and transfer the crushed cookies mix to the base of a spring form pan. Use a spatula to press them firm and chill in freezer for 15 mins or until firm. 
  2. Stir the gelatine powder in hot water until the gelatine dissolves. (Remark: If you find it's difficult to dissolve the gelatine completely, place the bowl of gelatine mixture in a large bowl of hot water. It helps the gelatine to dissolve easily and quickly.)
  3. Use an electric mixer to beat the cream cheese and sugar until smooth and creamy. Add lemon juice/ essential oil. Mix in the cream using slow speed until combined. Pour the gelatine mixture in and mix well. Pour the cream cheese mixture over the biscuit base. Tap the pan firmly on the table to level it or release some trapped bubbles. Refrigerate until firm or overnight.
  4. Remove the cheesecake from the fridge 15 minutes before serving. 
  5. Cut the mango into cubes, set aside. For the balance of the mango flesh, pour into blender with some lemon juice/ essential oil and blend them well.
  6. Spread the mango puree onto the cheesecake and arrange the mango cubes on top.
  7. To glaze, microwave (20secs) 1 tsp of apricot jam and hot water, wait till it is slightly cooled and brush onto the fruits using a pantry brush.

Note
For essential oil I only use Young Living brand, here's the website:
https://www.youngliving.com/en_SG
Lemon (Citrus limon) has a strong, clean, purifying citrus scent that is revitalizing and uplifting. It consists of 68 percent d-limonene, a powerful antioxidant. It is delightfully refreshing in water and may be beneficial for the skin. Lemon essential oil is cold-pressed from the rinds of lemons. Jean Valnet MD estimated that it takes 3,000 lemons to produce one kilo of oil. In his book, The Practice of Aromatherapy, Valnet wrote that lemon is a tonic for supporting the nervous and sympathetic nervous system. Lemon has an approximate ORAC of 6,619 (TE/L). TE/L is expressed as micromole Trolox equivalent per liter.

With a birthday tag, it's ready to be delivered as a birthday cake :)


Tuesday, 22 April 2014

Air-fried Chicken Pie


I always find it quite a chore to make chicken pies as you need to make the dough, cook the filling and bake it. But with the help of the puff pastry sheet and air-fryer, things seem more manageable ;) Here's a good recipe shared by Chelsia.

Ingredients
2 chicken thighs (deboned and cut into cubes)
1 onion (diced)
1 carrot (diced)
2 small potatoes (diced)
Mushrooms (optional)
2 hard-boiled eggs (remove shell and cut into half)
Light soya sauce
Pepper

Salt
Black pepper
Italian mixed dried herbs

Garlic powder
Worcestershire sauce

Plain flour
Milk

2 sheets of Pampas puff pastry (available from Phoon Huat)
Melted butter to glaze

Methods
1) Season the chicken cubes with light soya sauce and pepper.
2) In a pan/wok, saute onion and add in carrot and potatoes.Add some water to cook the vegetables followed by adding in chicken cubes and mushrooms.
3) Add in salt, black pepper, dried herbs, garlic powder, worcestershire sauce.
4) When the chicken cubes are cooked, sprinkle some plain flour and stir well. Pour in some milk and simmer for the vegetables to be soften.
5) On a non-stick baking tray (of Philips air fryer) lay 1 piece of Pampas puff pastry sheet as the pie base, use a fork to gently poke some holes.
6) Pour in the cooked filling and arrange the eggs on top.
7) Trim off the edge excess to make it neat. Use a brush to glaze the edges of the pastry with melted butter.
8) Cut the 2nd piece of puff pastry sheet to desired size enough to cover the top, I used a fork to press down the edges a little and poke some holes at the center.
9) Brush the top with melt butter and airfry at 180 degree for about 6 mins or until it form golden brown.


Wednesday, 9 April 2014

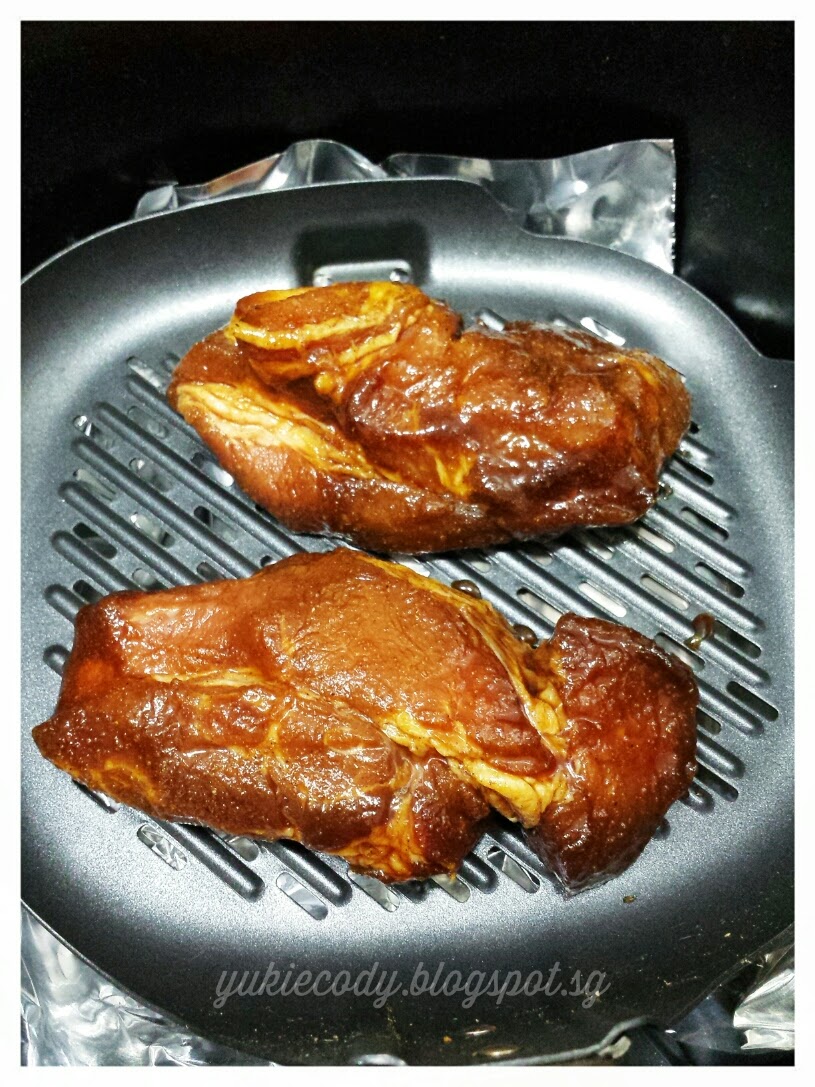
Air-fried Char Siew


 I used to roast my char siew using oven and after tried it on air-fryer, I find the latter is faster and tastier ;)

Ingredients (2pax)
200g Pork Shoulder Butt
1 tbsp Hoisin Sauce
1/2 tbsp Oyster Sauce
1 tsp Light Soya Sauce
1/2 tsp Dark Soya Sauce
1 tsp Chinese Cooking Wine (eg Hua Tiao Wine)
1/2 tsp Sesame Oil
1/2 tbsp Honey
1/2 tbsp Sugar
1 tsp Garlic Powder
1/4 tsp Chinese Five Spice powder
Dash of White Pepper

Rice and cucumber slices to go with the char siew


Methods
1. Slice the shoulder butt meat into 2 long pieces.
2. Marinate with all above mentioned seasoning and leave inside fridge overnight.
3. Pre-heat AF at 200 deg C for 5mins.
4. Place the meat slices on baking tray (without sauce) and AF for 10 mins at same temperature (oil not needed). At 5mins, baste with sauce and flip to the other side.
5. Reduce temperature to 160 degree C and AF for about 15mins until charred at some areas. Same thing, baste and flip at every 5mins interval until done.
6. Cool the char siew a bit and slice.
7. Heat up the remaining sauce and serve with the char siew.


 Oven-roasted char siew, using pork belly

Monday, 31 March 2014

Air-fried Mozzarella Garlic Prawn

This recipe is actually derived from my mom's pan-fried garlic prawns. I merely tried it using air fryer and added mozzarella cheese for a cheesy crusty top for a change. Credit should go to my mom :)


Ingredients
10 medium size prawns
5 garlic cloves (minced)
Pinch of salt
Mozzarella cheese

Methods
1. Preheat AF at 180deg C for 5mins.
2. Add oil & minced garlic and AF for 2mins, stir fry and heat for another 2mins until fragrant.
3. Add the prawns and AF for about 7mins or until cooked. In between I will stir twice to make sure evenly cooked.
4. Sprinkle pinch of salt, stir and add mozzarella cheese.
5. Turn temp to 200 deg C and melt the cheese, takes abt 3-5mins.


Note
I am using Philips air fryer, for this dish I made use of the baking pan to cook everything in it.

Sunday, 16 March 2014

Schnauzer Cake

Two of my friends have adopted mini Schnauzers dogs months ago and last Saturday was my first time meeting them (the dogs) at a dog cafe. One of my friends' birthday is approaching so I have decided to bake a cake for him. Since we are all dog-lovers so naturally I wanted to design the cake with some dog elements. Quite challenging for me since it was my first trial piping a dog design. I baked a coffee sponge cake and whipped up kahlua cream as the filling and topping. Here's the Schnauzer cake for my friend.


Recipe of coffee sponge with kahlua cream could be found in my earlier recipe (http://yukiecody.blogspot.sg/2013/08/coffee-sponge-with-kahlua-cream.html), I used a different flour brand and added much more kahlua this round and next time I want to add rum perhaps LOL. To pipe the dog design you will need to separate your cream into 2 portions. With a much large portion uncolored for frosting and some to pipe the muzzle part. Color a small portion of cream with black food coloring to achieve grey. Transfer cream into piping bag/ ziplock bag and without the need of any piping tip just snip off the tip of the bag and you may start your pipe. I used 3 slices of strawberries for ears and tongue, 3 chocolate chips for eyes and nose and half a marshmallow as muzzle (fully covered by the white cream in the picture). As for that bone shape biscuit, it was actually a dog treat.

Cake frosted without the dog design yet, I kind of like it simple just like this. Without frosting the sides, just the filling and spreading a layer of cream on top. This frosting design is using a spatula to do dab-n-pull in circular motion from working towards the center.

Molten Lava Cake

I have been hesitating for very long before I attempted to bake this super sinfully-good dessert. Not so much as I am afraid of the extra calories but the heatiness of chocolate is deterring me. Yesterday I gave in, just want to see how difficult it is to achieve the flowing lava inside the cake and to my surprise it is very easy to make. The main idea of this chocolate cake is to make sure that it is underbake so that the center part is uncooked and flow out like hot lava. So if you fail the first time, don't let that stop you. Simply adjust the timing and you will get it.


I reduced the recipe to halve so that I could try it using my air fryer which is older model and having a small capacity. Air fryer recipe is originated from http://www.ourprincessdana.com/2013/12/cooking-with-air-healthier-choice.html. Oven recipe can check from www.noobcook.com

Ingredients (yields 2 ramekin size)
50g dark chocolate (use chocolate bar and break into pieces or compound chocolate chips from baking store like Phoon Huat)
50g unsalted butter (cut into small pieces)
1 egg
25g castor sugar
10g self-raising flour

Methods
1) Melt chocolate and butter using microwave.
2) Beat sugar and egg until frosty and pale with electric whisk.
3) Pour melted chocolate and butter into batter, add flour and mix well with a spatula.
4) Grease 2 ramekins with melted butter and pour the batter. It shouldn't exceed 3/4 full to allow space for expansion. For my standard size ramekins it didn't quite fill up to 3/4.
5) Bake at 180 degree C for 7-8mins using a pre-heated air fryer.
6) Remove from air fryer and leave it to cool for 1-2mins before removing using a knife to loosen the edge.
7) Serve hot with icing sugar or ice-cream.

Such a pity that I couldn't capture the photos nicely due to the fast melting ice-cream, couldn't even see the flowing lava. Next time it shall be ;)

Monday, 3 March 2014

Air-fried Skinny Crust Hawaiian Pizza

Quick and easy fix by using Tortilla wrap as pizza base to achieve a thin crust.


Ingredients
1 Tortilla wrap
1 slice of fresh pineapple (or from can)
2 slices of ham
2 tbsp tomato pasta sauce
Generous serving of Mozzarella cheese
Black pepper & Italian mixed dried herbs (optional)

Packaging of Tortilla wraps

Before air-frying on the grill pan


Methods

This is easy, just assemble everything together by
- Spread tomato pasta sauce on wrap
- Arrange diced pineapple and ham all over
- Sprinkle generous serving of cheese
- More pineapples and ham cubes on top
- Sprinkle some black pepper and Italian mixed dried herbs(optional)
- Pre heat Airfryer at 180 deg C and place the pizza in for 7 mins.
- Serve hot and you could sprinkle some Parmesan cheese.


Fruity Pizza on Toast

Did another version using fruits and bread. Instead of pineapple cubes and ham, we used pineapple cubes and banana slices and not forgetting the pasta sauce and lots of cheese. We placed everything on a bread and AF for just 5 mins. Viola! Done! Quick Supper at 11pm! Oh gosh too late to eat but when you are hungry you have to give in...hahaha...